
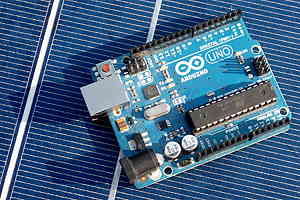
 You can power your arduino from the grid, from a battery and also with solar energy. Building a standalone photovoltaic (PV) system for your application is just about choosing the right components and connecting them with a few wires. What you need is a PV module, a battery and a charge regulator to get your arduino project running offgrid. The system basically is the same as if you would build offgrid PV for e. g. a caravan, a weekend home or a small house. Here we will scale this down for our arduino needs.
Standalone PV basics
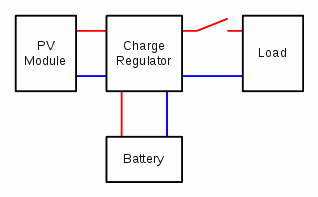 The picture on the left shows how a standalone PV system is connected. The battery is typically a lead-acid type and stores the energy from the PV module to supply it to your load during darkness or bad weather. The charge regulator protects the battery and has two functions: When your battery is fully charged and you still get energy from the module then the charge regulator limits the maximum battery voltage to protect from overcharge. The second function is a deep discharge protection. If the battery runs low then the load is simply switched off. This is why the load isn’t connected directly to the battery but to the charge regulator. When you have a load that should not run all the time like e. g. a lamp you can use the switch. Otherwise (like with a arduino that runs 24/7) simply omit the switch. The PV module converts sunlight or daylight to DC and is the energy source for the whole system.
Finding the right components is about how big the battery and the module should be and what is the highest current the charge regulator has to deal with. Now let’s have a closer look into the system and to the components:
System losses
Let’s begin with what we don’t want to have: The losses. This is a very important point when you want to set up a PV system that is efficient and cost effective. In a standalone PV system the module (called the PV generator) has to deliver the energy your load consumes plus the losses in your PV system. This means that your PV generator becomes bigger with increasing power consumption and (!) with high system losses. So it is always good to have a look at the losses. This will bring you a smaller (and cheaper) PV generator. When you are able to decrease the power consumption of your load all components of your system can become smaller.
The battery
Lead-acid batteries are very common in standalone PV systems because they have a high efficiency and because they are well suited for handling low currents over a long period of time. There are many different types of lead-acid batteries and not all of them are good for a PV system. We will look at this in a later post.
In the battery you have two sorts of losses: When you discharge a battery you get less energy out than you charged into it. The ratio is the efficiency of the battery. Good lead-acid batteries have a efficiency over 90%. This is not reached by other battery technologies. The second point is self-discharge. A fully charged battery looses energy without drawing any current out of it. Good types have a discharge time of more than one year from fully charged to empty.
The battery is also that component in your system with the most limited lifetime. Depending on the type and the usage lifetime can vary between around 3 and 10 years.
The voltage of the battery gives the system voltage. A system voltage of 12V is very common and this is what we will use in the PV system for our arduino. In a 12V system The actual voltage varies between 14V and 11V depending on the battery’s state of charge and load conditions.
When you have something like a standalone ATmega without a arduino board and with very little extra load then you should think about using a gold capacitor, lower system voltage and a very small PV panel. I will look at this in a later post.
The PV module
There are two different main technologies for PV modules: Cristalline silicon and amorpous silicon. Both are good for our system and both are available in small size. Amorphous silicon is better when you have bad light conditions (low irradiation). Which type of module you will take for your project depends also very much on the price and availability. Regarding the price per Watt small modules are much more expensive than the big ones for grid connected systems and they are sometimes of very poor quality. So have a close look at the type you actually choose in terms of price and quality (and electrical data of course).
The charge regulator
This is the component that ties everything together. Every current in the system goes through it. In normal operating mode (when the battery is neither full or empty) it does nothing but paralleling the module, the battery and the load. It becomes active only when the battery goes to it’s limits.
When the battery is full and has reached it’s maximum allowed voltage the charge regulator decreases the panel’s current so that the battery voltage doesn’t rise over this value. When the battery gets empty (battery voltage reaches the minimum allowed value) the load is switched off. It is turned on when the battery is again partly charged to avoid repeated switching off and on. Protection of the battery has higher priority than feeding the load. This is important to protect the lead-acid battery from deep discharge. Otherwise the battery’s life would be shortened dramatically. If you want to avoid this make sure you always feed enough energy into the system (make your PV module big enough).
In the next posts we will look in detail at all the components regarding function and dimensioning. Then you will be able to power your arduino with solar energy reliably and in a cost effective way.
Look at the following posts:
- The load
- Battery characteristics
- Battery selection
- PV module basics
- PV module dimensioning
- Charge regulator
- Building a real system
These posts should give you enough information to start a project.
Enjoy
heliosoph
Pingback: Run Your Arduino Using the Sun | MakerStage.com