
 A hot wire cutter as the one I described here only cuts in a straight line. Now I wanted to integrate some installation tube in my styrofoam. So I had to cut grooves into the foam. Cutting them with a knife won’t give a good result and so I had to find a new way to get the right shape. The idea was to bring a piece of wire in the shape I wanted to cut out of the foam and then to slide it through the foam.
The parts
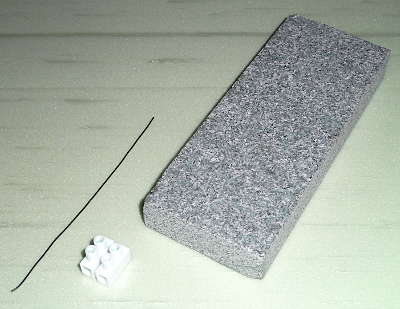 The picture shows all the parts (except for the wires to connect to the power supply). The wire on the picture isn’t the one that is used in the real thing. This is florist’s wire which is rather sturdy and which I thought is necessary for keeping the shape. But the maximum current of my power supply is too low to heat it up. So I ended up using again a guitar string! It is thin enough to get hot with the current I have and it also stays in shape if you don’t push a lot. The piece of stone is a leftover part of a granite tile. It has a good weight, glides well on the styrofoam and is heat resistent. I didn’t want to take a piece of wood… The terminals were stripped and only the metallic part was used.
Putting it together
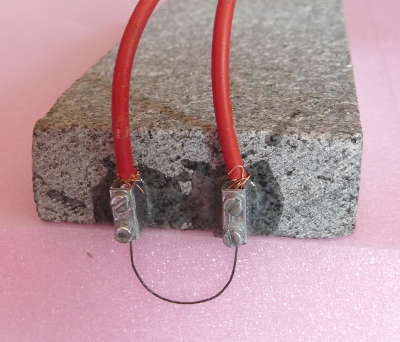 On the picture you see the assembled thing ready for action. The wire has to be bent in the right shape (simply by hand). When the outer diameter of the wire ring is a little smaller than the outer diameter of the installation tube then the tube afterwards really snaps into the groove. For me it was a good choice to have around 2/3 of the tube inside the foam and the rest on top of it. But this can also be altered by fixing the wire in a higher or lower posision. The metallic parts of the terminals are glued on the granite with epoxy glue. When you do this first connect the wire ring with the terminals and then glue it. Trying to glue the terminals alone has failled because they swim and alter their position in the epoxy. After hardening connect the wires and you are done and ready to go.
Cutting grooves
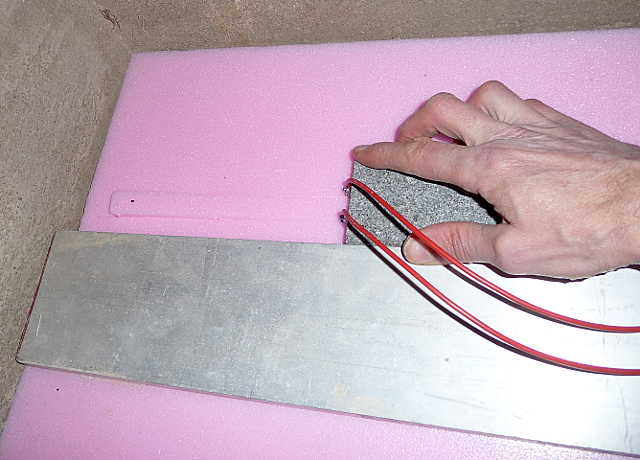
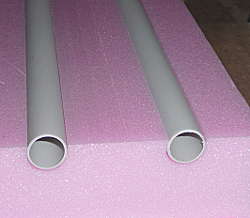
 A straight edge is a good choice to slide your new tool along as for the installation tubes the groove also has to be in a straight line. You will find the right current (for me: 4.6A) by slowly increasing the value until the wire glides gently through the styrofoam. It is even possible to dive into the styrofoam when you want to start somewhere in the middle 🙂 The picture on the left shows the groove and the part that has been cut out. Now simply snap your installation tube in and you willl get what you can see in the first picture.
Enjoy
heliosoph
Hi:
I am a sculptress who has always worked in stone or lost wax into bronze, however I am increasingly finding stone very heavy & bronze expensive so I want to try foam. I am needing a tool that can cut various shapes in foam, concave and convex, as well as straight, and of various sizes. Would you explain how to make a hand tool as such.
Thank you for your help.
RosLynn Schaefer
Dear RosLynn,
sorry for my late reply. For cutting foam you normally use a straight thin wire. You have a tool that gives some tension to the wire together with a spring that compensates the growth of length when the wire gets hot. You can make a stationary tool like this: foam cutter or you can make a U-shaped frame of e. g. wood (must be isolating) and have the wire between the ends of the U. The principle is always the same: you stretch a thin wire and you have a straight cutting line. I did my first attempts with a guitar string but nichrome wire (“heating wire”) is much better. Even with this straight wire you can cut complex surfaces by changing the direction of the wire while you cut. When you want to have the wire other than straight things become more difficult because the wire has to keep its shape by itself. I used a “flower wire” (without the usual green plastic cover!!!) and gave it the shape I wanted. Good to have steel wire because it is stiff and has higher resistance. When the wire has to keep its form things become more and more difficult the longer the wire has to be.
Power supply: You need a power supply that can be regulated. It isn’t important if the current is DC or AC. I took a lab bench power supply because I had one. Your power supply should have 4 to 8 amps current (my thin nichrome wire works best at 3.5 amps) and a voltage range up to 30V depending on the length of the wire you use. The longer the wire the higher the voltage has to be. It is important that your power supply is able to provide full current at low voltage. And very important: the output of the power supply must be completely isolated from mains!
Very best regards
heliosoph
Great idea