
 A hot wire foam cutter is a very useful tool to cut any type of styrofoam boards (expanded or extruded polystyrene) into the shape you want. The goal of this project is to build a low-cost cutter mostly from parts I found in my workshop that is able to do precise and straight cuts. Vertical and also miter cuts should be possible. This is a real hardware-only-project: no arduino, no programming, just plain mechanics and electrics: A thin wire is held in place and heated by a current.
Styrofoam boards can be cut in many different ways. The most low-tec version is a knife but you won’t get a precise cut. The second method is a hand-held circular saw as is commonly used for cutting wood. This gives you a straight cut when done properly but is limited to the thinner boards. You will also have a lot of noise and dirt. The saw must be big when you want to cut thick boards like 100mm. These saws are expensive even when you buy a used one. They are heavy and very dangerous. So only use them only when you have enough experience to use them safely.
The most comfortable way to cut the foam is with a hot wire that simply melts the foam. You have no noise, no dirt and no moving parts what keeps the mechanical part simple.
The frame that holds the wire
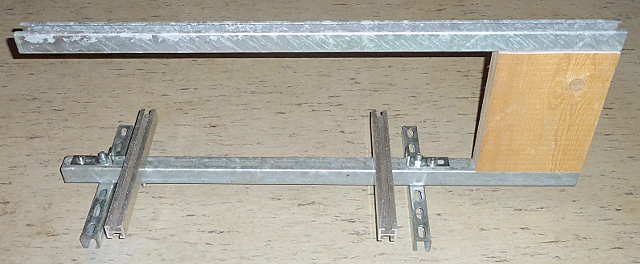
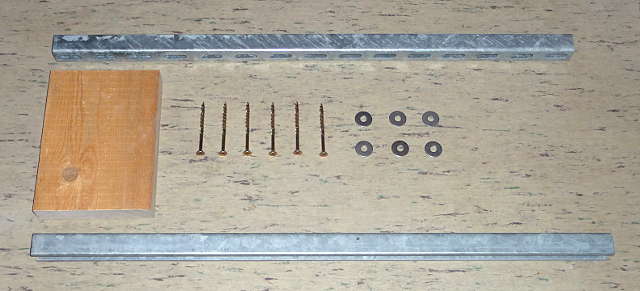 The picture shows the basic parts of the frame: Two steel profiles a wooden block and some srews. The steel profiles are standard 36x36mm C-profile with a length of 90cm each. This will give me a maximum cutting depth of around 65 to 70 cm and will let me cut the standard 1,25×0,60m boards into half. The wooden block is 250mm high to give enough space to cut boards with a thickness up to 200mm. The profiles are screwed to the wooden block on both sides. Wood is used to have the steel parts connected mechanically but insulated electrically. The current should flow through the wire but not through the frame 🙂
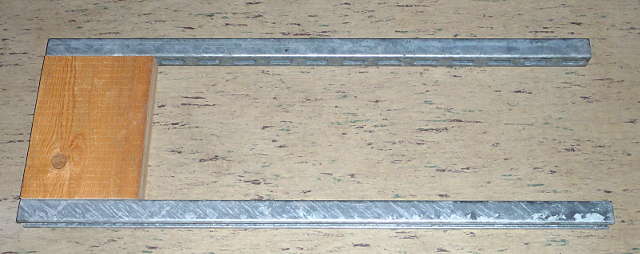
 Here you see the frame screwed together and how the steel profiles are connected to the wooden part. Note that on this side the force is much higher than on the side of the wire because of the long “arms”. The whole thing looks a little oversized compared to the thin wire. But smaller profiles would bend by the force of the wire.
Holding the wire
 The wire is a standard steel guitar string. This makes fixing the wire easy – at least at one end. The steel profiles are part of a system with many appropriate hammer head screws and connectors. The fixings for the wire are made from parts of this system.
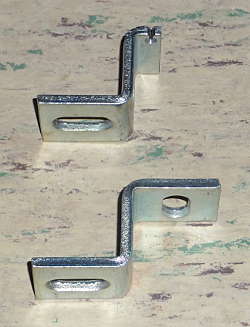
The picture on the left shows the original part below and the final part on top. I shortened it, drilled it partly with a 5mm drill giving a cone to hold the end of the string and then with 1.5mm. Then I filed and sawed a “entry” to let the string slide in.
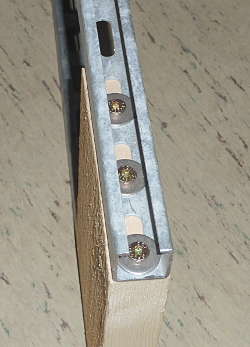
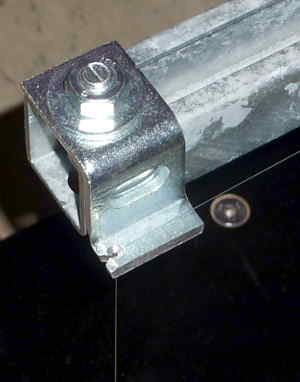
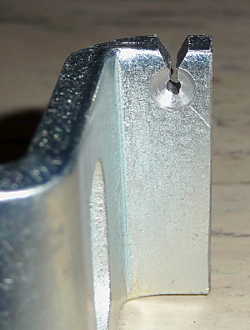 Here you see the result in detail. This one is the holder at the bottom. The one on top of the hot wire foam cutter is the same but mirror-inverted. The two parts can be fixed easily at the steel profiles using hammer head screws. The lower holder will get its fixed position. The upper one will be slideable to allow vertical and miter cuts.
Putting it all together
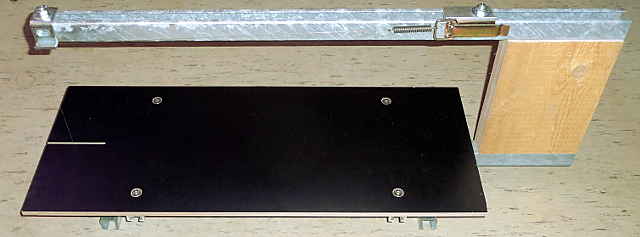
The picture above shows the frame together with the “feet” to stand on and the two holders for the base.

Now the base ist mounted. It already has a slit for the wire.
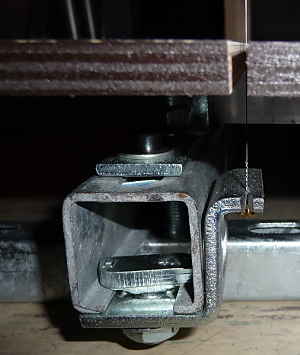 The holder for the wire under the base fixed with a hammer head screw. The string is already hooked in.
Here you see the upper holder for the wire. When opening the nut it is slideable and can be adjusted to the desired cutting angle (rectangular or miter).
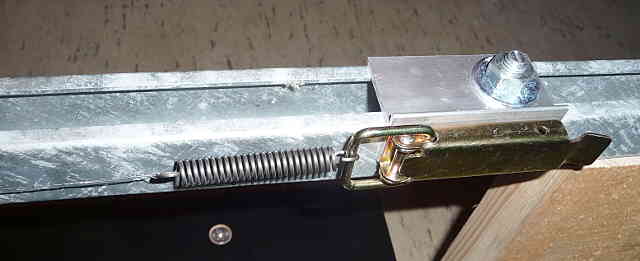
To have some tension on the string I took a spring together with a box closure. The closure is fixed on a piece of aluminum profile to have it also slideable on the upper bar to compensate length differences of the string when changing the cutting angle. The two pictures show the thing in opened and closed position: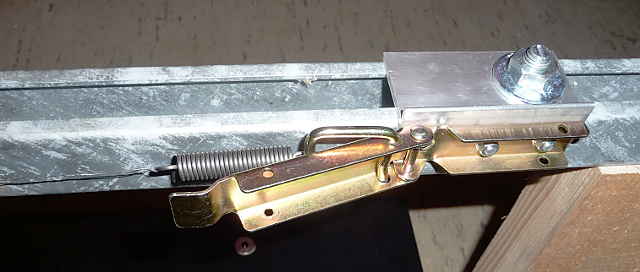
Now the mechanical part is complete:
First tests
The first tests were done with a lab power supply to have full control over voltage and current. It showed up very quickly that I was wrong about the strain of the string. Steel guitar strings have a tension of around 90N (9kg). So I dimensioned the spring to give half of this tension to the string. But when the string is hot this tension is way too much and the string breaks although the temperature isn’t high enough. Additionally, the E string with a diameter of 0.012 inch is too thin and breaks. I did some tests with a 0.016 inch B string which seems to be much better.
Conclusion
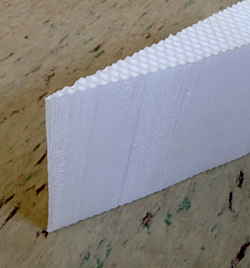
The picture on top of this post shows the result of one of the first tests I made and it is very promising. The thickness of the foam is 10cm. So the mechanical part of the hot wire cutter has come to a good end but further experience is necessary for the right string together with the best tension and current to get even smoother cutting surfaces.
What I built is mostly based on the materials I had in my workshop. This cutter is not intended to be copied exactly but merely to show you my construction ideas and to inspire you to do something similar.
To be continued with the electrical part…
Enjoy
heliosoph
Try using Nichrome wire. AWG#26-22 is very suitable. I am using a 10A Variac transformer and a 100W 5-10 Ohm resistor in series to control the wire current.
I have been cutting foam successfully in a similar manner to yours for many years without any wire breakage.
I also mount nichrome loops shaped to specific cutout patterns on long pieces of wood to allow blind cavities in foam.
Give it a try.
Regards,
Gerhard
Thank you for your reply. At the moment I’m using constantan wire. This works very well. I think the problem of the steel wire is that the resistance increases with temperature. As the wire is cooled by the foam that is cut the resistance is lower and also the dissipated power. In the region where the wire is outside the foam it gets much hotter because it isn’t cooled by the foam. So we have much more power dissipation (=heat) exactly where we don’t want to. Since I changed to constantan wire I didn’t have to change the wire because of breakage. Current control is done directly from my lab power supply.
Regards
heliosoph