 We have already defined the electricity consumption (=the load) and the battery size of our standalone PV system. We also know about the electrical characteristics of a solar panel. Now it’s time to determine the size of our panel. This is what we will do in this post. The key to this is the basic function of the system: The PV module has to bring enough energy to keep the system running. This means that the energy from the module must be at least the electricity consumption plus the system losses. Then the system will work. For a calculation we will take the consumption per day.
Positioning the panel
A very important point is: What is the best place for the panel? Obviously: In sunlight 🙂 This means: Install the panel outside your building at a place without any shade. The calculations and tools below are based on this. Shade on the panel e. g. from a tree or from another building will reduce your solar input a lot. Irradiation in shade can be 70% to 90% lower than in direct sunlight. So keep the time in shade as low as possible. And don’t install the panel inside a room unless you make a very low power system with special indoor cells. Windows swallow 20 to 40% of the irradiation. Inside a room you can easily have only 1% of the irradiation outside. Then standard modules won’t work anymore.
Solar irradiation

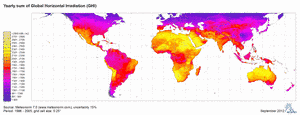
© METEOTEST; based on www.meteonorm.com
The picture on the left shows the total solar irradiation for many regions of the earth. What you see on the map is the total irradiation over one year. This is good for a first impression about the region your system will be. As these are the annual data you can use it only for a calculation based on the average per year. This is good when planning a grid-connected PV system. But for a standalone PV this would be too coarse because you don’t see the differences between summer and winter. We have to take the monthly average of the solar irradiation as a base for our calculation. There is a very cool online tool available at www.solarelectricityhandbook.com that shows you the monthly average of the irradiation per day based on your location and the orientation of your panel. When you play with it (change the orientation and the tilt angle of the module) you can find see the difference between summer and winter and the influence of orientation and angle. The best orientation is South (on the southern hemisphere North 🙂 ). Different tilt angles make the difference between summer and winter smaller or bigger. This way you can find the optimum mounting position for your project depending on the period of the year it has to run.
Dimensioning the module
The size (=max. power) of the module determines the amount of energy the module gives us. The bigger the module the more energy we get. For dimensioning one does a calculation on a monthly basis. For every month of the year one can calculate the average amount of energy that is delivered per day. Comparing with the electricity consumption plus the system losses shows if the energy production is enough. For regions in Europe and Africa the European Commission has a tool online that does calculations for grid-connected and also for standalone PV systems. The links guide you to the dimensioning tool for Europe and for Africa. On the right side go to “Stand-alone PV” then enter the power of a module the battery voltage (system voltage) and the capacity of your battery. Next step is the max. discharge rate of your battery. This means how deeply your battery should be maximum discharged. You also need the electricity conumption in Wh (consumption in Ampere-hours x system voltage) and the orientation of your panel. Select your location on the map. Click at “show graphs” and “Calculate”. You will get a lot of system data and also a graph that shows you the relation of energy production and energy consumption. In this graph you can see the months during which the system will work fully. Now you can play with different sizes of modules and different orientations to find what fits best to your needs.
Another good online calculator is at www.solarelectricityhandbook.com that calculates your stand-alone system for most of the regions of the earth. Here you can directly enter the consumption of your different devices. Also check it out and play with it.
Other criteria
One thing that has a big influence on the panel you will actually choose is availability and price. PV panels for grid-connected systems are mostly in a range of 200W to 300W of power. There is a very big market for these modules and they are available for good prices but they are much too big for most of the arduino driven systems. Finding a panel with 20W or even 5W can be a bit harder. Also the price range of different 20W modules can be enormous. This means: Do a first calculation to get the desired size of module. Then look at the modules you can get and calculate again with the data of these modules. Afterwords you will see which of them fits best.
Another thing is that these calculations are never 100% exact. This is because the weather data for the calculations are averages over several years and the real weather will not be the same. The other point is that your energy consumption will very often not be exactly what you calculated (or guessed) in advance.
Now you have the factors that are important to choose a PV module for your system. The next steps are the charge regulator and finally building a system.
Enjoy
heliosoph

Solar Energy really is the way forward and I can’t wait to see how it’ll do in the future.
Hello,
to me solar energy together with the other renewable energies is the solution for our energy and climate problems. It has to be done in large scale (power plants) and also in small scale (domestic solutions). This always comes together with energy efficiency: Reducing consumption but still having the same comfort.
regards
heliosoph
Hi, do you have a working system still? How is it working out?
I had the system up and running for one summer and I used it for automated irrigation for my vegetable garden. It worked perfectly what really wasn’t surprising as the pv module was way too big. Actually, it was a 40W module with a broken front glass but still working. Probably even a 5W module would have been too big as the pump worked for 10min a day. The system doesn’t exist at the moment because I moved to another place.
Best regards
heliosoph
At the link for the Irradiance Calculator is reported:
How to use the
irradiance calculator:
…
“The irradiance calculator will then show monthly figures showing the average kWh per square meter per day for energy at your location.”
“You can multiply this irradiance figure by the wattage of your photovoltaic panels to give you an average daily amount of energy you can expect to generate with your system, measured in watt-hours. ”
by the wattage??
The irradiance figure should be multiplied by solar panel area, and imo also by the efficiency of the solar panel;
example: In Florence in January for a certain orientation I have 2.41 KWh/sqm/day.
2.41 KWh/sqm/day * 1.3 sqm (area of my panel) * 0.124 (12.4% efficiency of my panel) gives 0.38 Kwh/day
Let me know if I am wrong.
Thanks, Francesco
Hello Francesco,
yes, you are absolutely right. The irradiation per square meter is multiplied with the area of your panel(s), the efficiency and the performance ratio. This will give you the amount of electrical energy. Performance Ratio usually is around 0.8.
Thanks a lot for your comment!!!
Best regards
heliosoph