
prologix, LLC
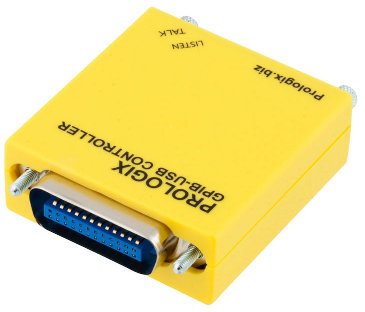
In my lab I have some test and measuring equipment like an arbitrary function generator, a desktop multimeter and a DC power source. All of these devices have a GPIB (IEEE.488) interface. So what I want to do is to control these devices from my Debian Linux computer and to read out data. During the last weeks I read a lot about how to connect GPIB devices to a computer and how to communicate with them. Out there are many ways to do it. They differ very much in cost, complexity and comfort. Finally I decided to buy the Profogix GPIB to USB adapter. It has a microcontroller inside and does all the basic GPIB communication things by itself. This is a rather low cost solution that works ootb 🙂
In this post I will show you what ootb means on a Debian machine:
Hardware and installation
Starting with Debian Wheezy, the actual testing installation as of 2013/4 you connect the Prologix adapter to the PC via a standard USB cable. Also connect the adapter to your measurement devices with GPIB cables. When you have only one device you don’t even need a cable. Simply plug the adapter to the GPIB connector of your device. When you plug in the adapter a virtual serial device is created. No need to install a driver. To find out the name of the device look at /var/log/messages
Open a root terminal and type: tail -f /var/log/messages
Here you see how the adapter is connected to the system. The virtual serial device is something like /dev/ttyUBS0. In debian Wheezy the user (you) must be added to the group dialout. So type in your root window: adduser <yourusername> dialout. Now close the root terminal and log out and in again to take the adduser command effect. And YOU ARE DONE 🙂 🙂 The rest can be done as a user.
setting up communication
Now open two terminal sessions. Use the first one to see the output of the Prologix adapter. Here you type:
cat </dev/ttyUSB0
You have to change /dev/ttyUSB0 to what you found in your /var/log/messages. Now everything the adapter sends to the computer via the virtual serial device is displayed here. With the second terminal you send the commads to the GPIB USB adapter:
echo "++ver" >/dev/ttyUSB0
Again you have to change /dev/ttyUSB0 to what you found in your /var/log/messages. In the first terminal window you see the output of the adapter. It should look like this:
Prologix GPIB-USB Controller version 6.101
And THAT’S ALL. Communication between your computer and the Prologix adapter ist up and running! 🙂 🙂 🙂
Now you set up the adapter according to the manual and according to your needs. The commands starting with ++ are interpreted by the controller itself. All other commands go directly to the bus. If for example you have a Fluke 45 multimeter that has its GPIB address set to 12 then type in the second terminal window:
echo "++addr 12" >/dev/ttyUSB0
echo "++auto 1" >/dev/ttyUSB0
echo "*RST; OHMS; RANGE 1; RATE M; TRIGGER 2; *TRG; VAL1?" >/dev/ttyUSB0
The third command is an example from the Fluke 45 manual. This resets the Fluke 45 sets it to resistance measuring range up to 300 Ohms and measures and displays the resistance once. So when you connect a 100Ω resistor to the terminals you can see the following output in the second terminal window:
+99.36E+0
So this is GPIB communication on a Linux machine only using bash commands!!
What you have seen in this post is just the very basic communication. It is nothing more than writing to and reading from a virtual serial port. And it can be done with two basic bash commands: cat and echo.
hope this helps
heliosoph
After days searching how to make Linux talk to the GPIB-USB, your site http://heliosoph.mit-links.info/gpib-on-debian-linux-the-easy-way/ made it happen for me…. well almost.
I get back a message of :
Prologix GPIB-USB Controller version 6.101
But when I send the command:
echo “*IDN?” >/dev/ttyUSB0
nothing happens, but if I send it once more on my Agilent 34970A DAQ, I get the error -410 query interrupted being displayed on its LCD.
First of all, thank you very much for your reply. It had me reading again my post and the prologix manual. So I found a bug in my post. In my example with the Fluke 45 the first command “++addr 12” sets the address. Change this to the address of your device. The next is “++auto”. This shows you if the controller is in auto mode or not. You better give “++auto 1” to be sure to have the controller in auto mode. Auto mode means “read after write”. The controller sends a command to the GPIB device and waits for an answer. Personally I don’t have experience with your Agilent device. To test communication first try a simple command where the device tells something like type, address, series number or so. When you don’t get it running try the low level commands described in the manual of the controller. Otherwise ask the people from prologix.
hope this helps
heliosoph
Thank you for posting this guide, it helped me a great deal with finding and communicating with the GPIB Controller. I’ve almost got everything up and running, except that I’m having an issue communicating with the instrument (multimeter) on the other end of the controller. I can query the version, mode, and so forth of the controller just fine, but sending commands strings for the multimeter (such as *IDN? and *MEAS:VOLT:DC?) produce no response. Any ideas on what’s going on, and how I should go about solving it? Once again, huge thanks for making this guide, it’s probably the most useful resource I’ve found for working with these GPIB Controllers.
Nick
Hi Nick,
thanks a lot for your very kind reply!!! What you describe says that communication with the contoller is ok but with the instrument it doesn’t work. First thing I would check is the GPIB address of the instrument. Look at the manual of your device on how to configure and read out the GPIB address. Then you tell the controller with “++addr n” to send the data to address n. The other thing on the device is to check if it accepts commands on the bus or if it is in local mode where it only reacts on the keys pressed at the device itself. If this is all ok send a command to the device like what you did with “*IDN?” and look for the response. With your command “*MEAS:VOLT:DC?” you should see on the display of the device if something is happening.
heliosoph
So what exactly should the command look like if I’m trying to communicate with the instrument? Should I be adding “++addr n” (in my case, it appears that n is 22, as sending “++spoll 22” returns 0 in the output terminal) to part of cat /dev/ttyUSB0 , or does it have some other syntax? I’ll admit that I’m pretty new with this, so I hope I’m not missing something obvious.
Nick
Hi Nick,
with the command “++addr 22” (means you type: echo “++addr 22” >/dev/ttyUSBx where x depends on your configuration, see my post) you set the GPIB address the controller will talk to and listen from to 22. You can check this with the command “++addr” without a number. Then the controller gives back the GPIB address he is using. Normally the controller is in auto mode on startup. This means it does read after write. When it writes a command to the GPIB bus it automatically listens to the bus (with the address given before) after the write command and sends what it gets to the USB connection. You can set auto mode with “++auto 1” and check with “++auto”. All commands starting with ++ are interpreted by the controller (for configuration of the controller). All other commands go to the GPIB bus. Now look in the manual of your instrument and take a command that gives you the ID of your device. These commands are instrument specific and don’t have anything to do with the controller. E. g. when you have a Hameg 408 scope you send the command “ID?” and you get back “Hameg 408”. This is the test if your communication is ok.
hope it helps
heliosoph
Thanks a bunch, that really clears the matter up. The way I had been interpreting it was that the addr command was changing the actual GPIB address of the device, and not where the controller was attempting to communicate. Setting ++addr 22 now has the other commands I tried returning responses. I greatly appreciate the help!
Nick
Thanks again, great you got it up and running. You can change the GPIB address of your instrument only at the instrument itself, not over the bus. The controller’s job is to tell the devices what they have to do on the bus (talk or listen) and to send or receive the information to and from the instruments. On the bus only one device at a time can communicate with the controller because all devices are in parallel. Now the address is needed to know which device has to listen or talk.
Best regards
heliosoph
Pingback: Python reading and writing to tty | Developers Questions - Msn4Free.com
this helps indeed, thanks
Hi heliosoph,
I liked your idea of using bash to get things to happen with the USB-GPIB unit. I am using Ubuntu 1404 LTS with the open hardware version from http://www.github.com/Galvant/gpibusb-pcb. Their software is too abstract for me to understand what is going on. I wrote a bit of python and that works the USB-GPIB hardware, but not the scope. I would be happy to emulate a printer and call a plot from the scope and capture it on the Linux PC.
Bash didn’t work! I think that with two sessions accessing the same hardware, only the focused session has access.
I will persist with my python code and read the prologix manual to understand the ++xxx commands as the documentation I have is a bit thin.
Thanks for the idea.
GB
This is exactly what I want. BUT.
Using Ubuntu 14.04 everything seems to work ok except that I have no /dev/ttyUSBx devices.
I do have /dev/gpibx devices (lots of them).
I think everything else is configured correctly because if I use ibconfig I get sensible, error free, results.
Replacing ttyUSB0 with gpib0 doesn’t work. It just produces:
oscar@TS440:~$ cat </dev/gpib0
cat: -: Invalid argument
Any suggestions?
O
Hi Oscar,
thanks for your reply. You should find out the name of your device the way I described in the post: Look at /var/log/messages with
tail -f /var/log/messagesas root and then plug in your device. Then you should see how it is connected. Personally I’m not that familiar with Ubuntu as I am using Debian but these things should be the same on both systems.Best regards
heliosoph
I forgot a very important aspect. I am trying to use an HP82357B adaptor.
If I look at /var/log/syslog then I see that the device appears as /sys/devices/pci0000:00/0000:00:14.0/usb3/3-7.
There is no mention of /dev/ttyUSBx.
I should also have said that I get error free results and transfers if I run ibtest (not ibconfig).
Is it possible that this device driver is not written to emulate a serial port?
Thank you for a good article though.
O