
An arduino board like the Uno can be a programmer for a standalone ATmega chip. For the ATmega328P that is used in the Uno there is a tutorial on the arduino homepage. This lets you burn the bootloader into the chip without the need for other hardware. This post shows how to use the same configuration for reading and writing the fuses on the chip.
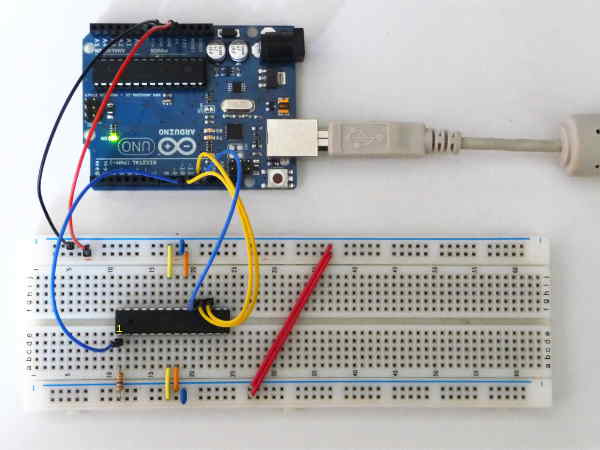 My setup is the same as in the tutorial. Burning the bootloader is easy if erverything is done exactly as described in the tutorial. Then I thought: Ok, the ArduinoISP is a programmer. So it should be possible to not only burn the bootloader but also to communicate directly with the chip being programmed. What I wanted is to read and write the fuses of the chip. The software that makes this possible is avrdude. When you have the Arduino IDE installed you also have avrdude on your system. It took me some time to find the right arguments to get it running and this is the main reason why I write this post.
My computer runs with Debian Wheezy and so the instructions are tested on Debian. When you have another OS you have to change the name of your virtual serial connection. For the following things to run you need to have the ArduinoISP sketch from the examples uploaded to your arduino board.
Reading the fuses
Avrdude runs on the command-line. On a Linux system open a terminal window and type:
avrdude -P /dev/ttyACM0 -b 19200 -c avrisp -p m328p -v
-P tells avrdude which serial connection is to be used. You can find this out when you have your Arduino IDE up and running. Look at tools –> serial port and see the name of the port that is activated. This is the port that connects to your arduino which is the programmer for your chip.
-b is the baudrate of the serial connection and has to be set to 19200. Omitting this won’t work.
-c gives the name of the programmer. It should be arduinoisp but this doesn’t read the fuses of the chip correctly. On my system it works with avrisp.
-p declares the chip being programmed.
-v is the verbose mode of avrdude and tells you a lot about the programmer and also the chip that is connected. At the end of this report the device signature and the settings of the fuses are displayed: lfuse is the Low Byte fuse, hfuse is the High Byte fuse and efuse is the Extended Byte fuse. With the signature you can check which controller you really have.
When you type
avrdude
without any arguments you get a short explanation of all the options of avrdude.
What do they mean?
The fuses are described in detail in the datasheet of the ATmega328P. There is also a helpful online tool. Getting the settings out of the fuses’ values is easy when you take a fuse calculator like this one from Engbedded. At the lower end of the page you can type in the settings that avrdude gave you. Then you see above the explanations. You can alter the settings and then get the values for the fuses and also the arguments for avrdude.
As an example we want to change the Brown-out detection settings. These are controlled by the lowest three bits of the extended fuse, bits 0 to 2. The other bits aren’t used. Avrdude reads and writes them as logical 0. When we set Brown-out detection level to 1.8V the value is 00000110 binary equals 06 hex. Now the instruction for avrdude is:
avrdude -P /dev/ttyACM0 -b 19200 -c avrisp -p m328p -U efuse:w:0x06:m
-U is a memory operation in the chip, e. g. write or read
efuse addresses the Extended Fuse
w specifies a write operation
0x tells that the following number is a hexadecimal value
06 is the data we send to the chip (see above)
m says that the specified command-line value has to be programmed
This gives you more control over your chip 🙂 But it is very important to check the values before (!) you set the fuses. With wrong settings you can easily bring your chip into an unuseable state.
Enjoy
heliosoph
Thanks for this. I was beating my head against the wall using someone else’s guide, which was full of capitalization and syntax errors. Using this I was able to figure it out and get my extra I/O pin on a tiny85. Details are important. Nice work.
Just beautiful; I had struggled for about two weeks trying to read atmega16A signature. Your command , modified for my set up-“C;\avrdude -P COM3 -b 19200 -c avrisp -p m16 -v worked miracle and gave a nice output of atmega16A.
I tried the command- “C;\avrdude -c avrisp -p m16 -P COM3 -b 19200 -U lfuse:r:i”- to read and write lfuse to a file i and I get the following error
“avrdude: writing output file “i”
avrdude: output file i auto detected as invalid format
avrdude: invalid output file format: -1
avrdude: write to file ‘i’ failed
avrdude: safemode: Fuses OK
avrdude done. Thank you.”
I replaced i by Fuse.txt but a similar output.
Can you please let me know how do I specify the file to which will be written?
Many thanks again for the nice write up.
Suresh
Thank you very much for your post and sorry for my very late reply.
You could look at to find the docs of avrdude. -U lfuse:r… reads the fuse and writes it to a file. Seems like you don’t have specified a filename, only the format of the file (intel hex). Didn’t try this personally.
Best regards
heliosoph
Pingback: [How To] Read and Write fuse in ATMEGA328P | Just A Paper Reading
Pingback: Steuerung der Signalanlage « Tramspotters´ Page